Followers

Sunday, May 28, 2017

Elegant Happy Birthday

Hello everyone! It's Christi and today I am going to show you a fairly simple card that looks elegant (and just maybe expensive!)  I hope you enjoy it!

Before I get started on the details I wanted to tell you that this card is 5" x 7", which is larger than my typical card, which are either A2 (5 1/5" x 4 1/4") or occasionally square, which, for me typically runs 5 1/4" x 5 1/4".  I had considered trimming the die down but I am very glad I didn't.  Sometimes life calls for a big card and this is one of those times.
What I Used to Make My Card:
White Card Base, 5" x 7"
White & Red Cardstock
Tattered Lace Rose Panel, #D307
Quietfire Stamps, Happy Birthday Plain & Simple
Simon Says Stamp Ultra Fine Embossing Powder, white
Nuvo Crystal Drops in White


This is my very first Tattered Lace die and it is amazing! The details are so pretty and delicate, I took a close up picture so you could see the flowers that are etched on the "long" side of the die (you can click on the photo to make it bigger.)  I wanted to keep this card simple so all the flowers would be the focal point.  And while I made this a birthday card, you could certainly change the color and/or sentiment to read however you want.


First I die cut the main panel out of white card and layered in onto some red
cardstock.  Then I cut the Memory Box die out twice from red.  I centered the main panel and attached the two side panels.  Lastly, I used the same red card and white embossing powder to have the Quietfire Design sentiment become a focal point.  I was going to use two white brads to hold the sentiment, but I made a bunch of my own Nuvo Crystal dots and used them in place. Thank you so much for reading my post, have a wonderful day! Christi

Don't forget to play along at the Dies R Us Challenge Blog for your chance to win a gift voucher to the Dies R Us Store.  A new challenge begins on the first and fifteenth of every month.  
Be sure to Follow Us on Facebook too. 

click below for:
I am entering my Elegant Happy Birthday card in the following challenges:
The Crafter's Challenges - #173, Birthday
Mod Squad Challenge - Birthday Bash
QKR Stampede - #245, Birthday
The Crazy Challenge - #249, Birthday

Sunday, May 21, 2017

Floral Hello

Hi everyone! I love all the texture on this card; plus, I feel like I sort of "re-purposed" a die. I hope you enjoy my card.


What I Used to Make this Card:
White Card Base
White Cardstock
Various Colored Cardstock
Green Cardstock
Darice Floral Vines Embossing Folder, 1218115 (got mine at ConsumerCrafts)

Plain Butterfly Wreath
First thing I did was cut out out the wreath die in green, thinking that I would attached the flowers from the Floral Confetti and the green would be the stems and leaves. Well, let me tell you, I ended up with a huge amount of flowers; in fact, you will be seeing a card I made with the leftovers very soon.
The Flowers

Once I had my flowers and wreath cut, I worked on my craft mat so that any glue leaking wouldn't be an issue, since I knew I'd be gluing things in places they technically didn't belong.  It took me days to get the placement of the flowers where I wanted them (please don't take me literally - I typically work on a few projects at once, so when I say days I really mean some time each day, for a few
Placing the Flowers
days. Clear as mud?) but I finally did, cleverly covering all the butterflies, and I even snuck a heart into the design. 

Setting the wreath aside to dry fully overnight, I wasn't sure what else I was going to do to the card. I could have left the card alone after I placed the wreath on it,  but I felt a bit more was needed. Using white card, I embossed a piece that was about 5 1/4" x 4" using the Floral Vines Embossing folder.  Liking what I saw, I still felt there was one thing missing.  I had the Hero Arts Stamp & Cut set on my desk (ok, truthfully, I
KNEW it was on my desk but it took me a few minutes a while to find it.  Once I did, I used the
Another Look
die to cut out "hello" in lavender cardstock.  This card is so colorful and bright in person; I'm very pleased with the outcome. 

Thanks for stopping by! I truly appreciate all your support and I hope you get a chance to check out the Dies R Us Inspiration blog for fresh projects every day! Fondly, Christi


Don't forget to play along at the Dies R Us Challenge Blog for your chance to win a gift voucher to the Dies R Us Store.  A new challenge begins on the first and fifteenth of every month.  
Be sure to Follow Us on Facebook too. 

click below for:

I am entering my Floral Hello Card in the following challenges:
A Gem of a Challenge: #194, Spring Fever
Aud Sentiments - #180, Anything Goes with a Sentiment
Cardz for Galz - #47, Add Some Texture 
Crafty Gals Challenges - #123, Add Flowers
Word Art Wednesday - #282 -282, Anything Goes
Tuesday Throwdown - #383, Texture
a2z Scrapbooking - May, Sentiment is Main Focus
Country View Challenges - May, Flower Power
Die Cut Diva's - May, May Flowers
Happy Little Crafters - May, Anything Goes with Die Cute

Friday, May 5, 2017

Playing with Oxide Inks, #1 (and Hero Arts)

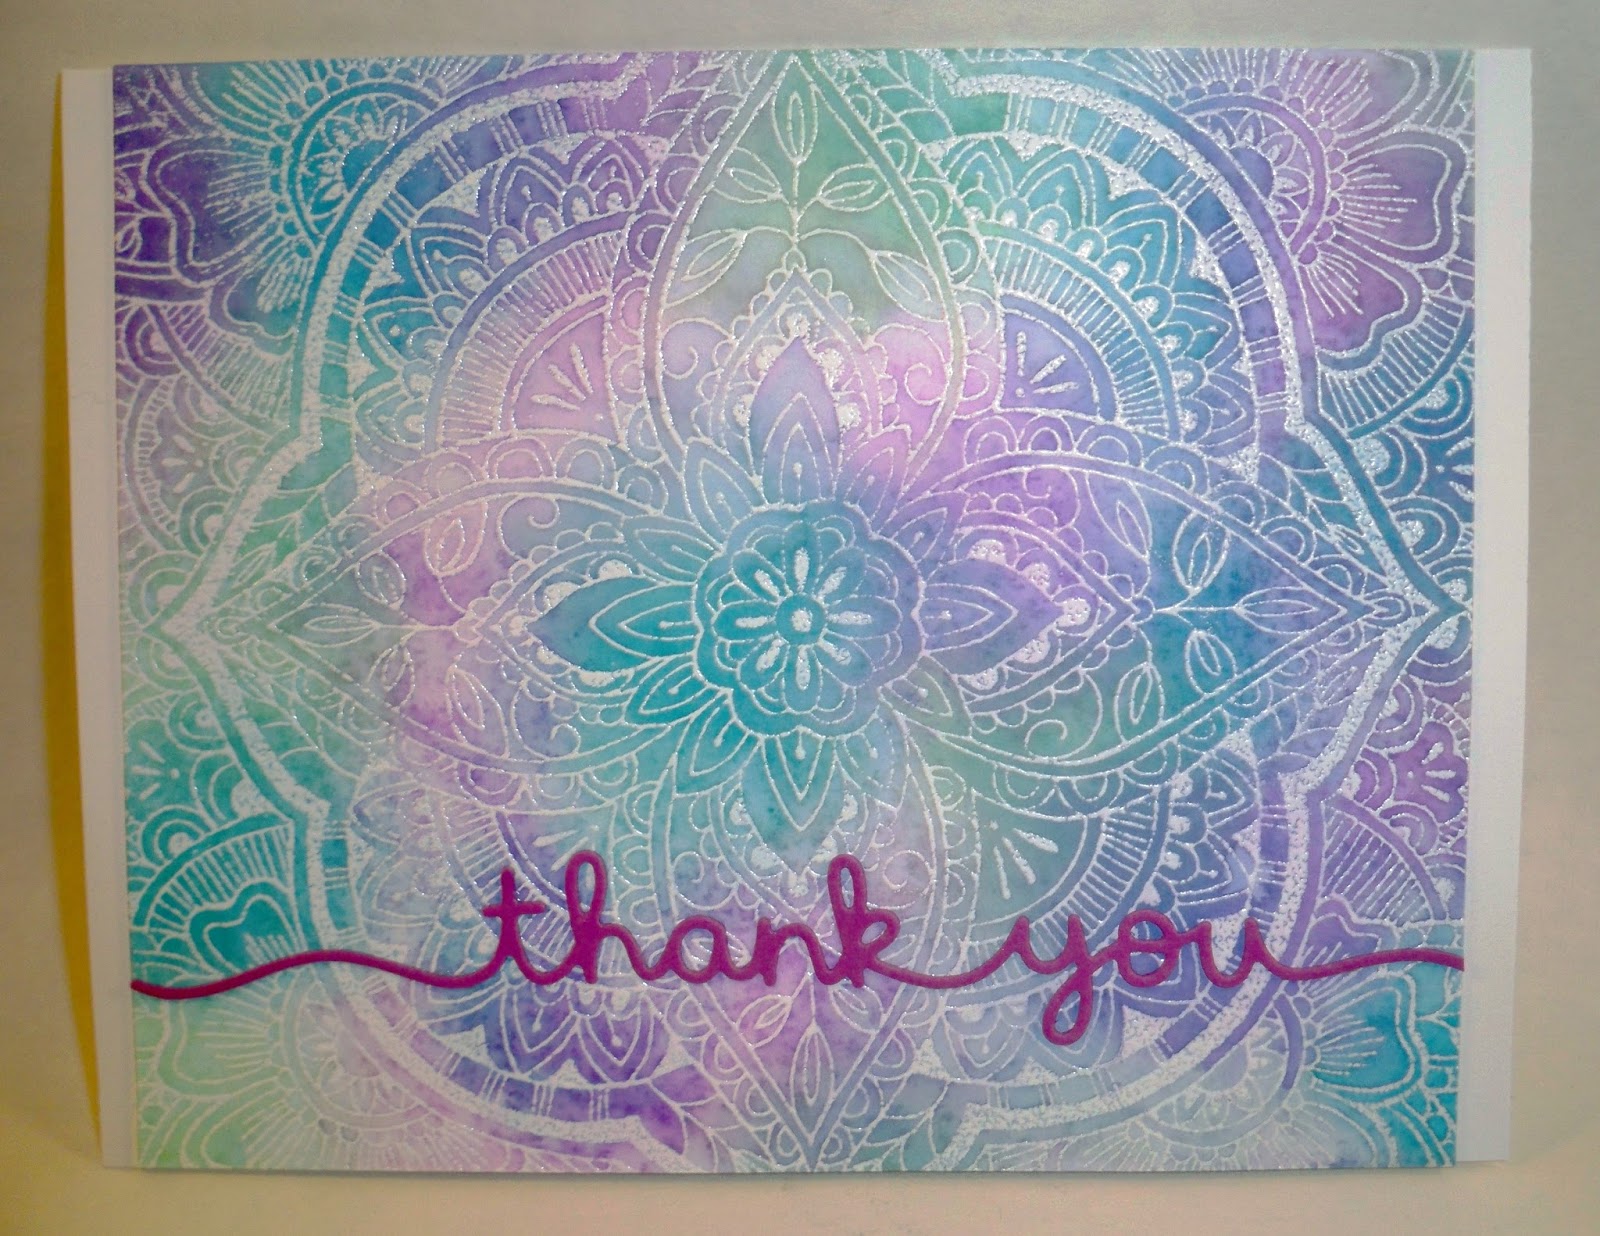
Hi everyone! I am thrilled to say I finally got a chance to play with my oxide inks and, if you could see my craft room, it is very apparent that I am nowhere near done.  But I tore myself away from playing to write this up and begin to show you how I used the inks.  As always, you can find tons of information on YouTube, Pinterest, and many other social media sites.  Here is my card:

For some reason the "Thank You" looks really pinky red.  It matches better
than that in real life

What I Used to Make my Card:
White Card Base
White Panel 
Hero Arts Spice Market Background, #CG638 (Disc. Got mine at Amazon)
Simon Says Stamp Fine Detail White Embossing Powder
Distress Oxides in Wilted Violet, Cracked Pistachio & Broken China
Lawn Fawn Thank You Border
Scrap of Matching Paper for Border
MISTI
Tim Holtz Mini Ink Blending Tool


In the interest of general disclosure, I really thought I wouldn't be able to this. I was positive that I would mess it up somehow - it was so bad, in fact, I waited, with all the products out & ready to go, while I gathered my courage. Turns out it was one of the simplest things I've ever done!  While some people suggest you do your background first and then do the embossing, since this is such a large stamp (I have missed inking up parts of large stamps before) I decided to do the embossing first,  I used my trusty MISTI, just in case I missed a part of the stamp, inked it with embossing ink, and stamped onto white card.  I then repeated the procedure just to be safe.  My embossing ink pad is SO old, it has different embossing inks and fluids mixed on it but I do get a faint pink color after something has been stamped, so that does help you to know you are good and got the entire stamp. 


How I started the Panel
I used Simon Says Stamp Fine Detail White Embossing powder (backtrack a bit - I did dust the paper with those dust things that are supposed to help you to only get embossing powder where you want it.  I do it every time because I'm conditioned and I do think it helps a lot.)  One of my biggest issues was with white powder.  I always, without fail, get it everywhere.  I never embossed white onto black or navy because it looked just SO bad.  Since I have been using the Simon Says Stamp Fine Detail White Embossing Powder, my fears have gone.  I don't know what magic they put into this, but I have had nothing but nice, clean embossing (unless *I* mess it up.)  I bought a bottle a month or two ago and I already need another bottle. Worth it to me! (I am not compensated by Simon Says Stamp, I just love it when I find a solution to a problem and I hope others might benefit from the information.)
The Panel before it got cut down


Anyway, once the heart embossing on the background was cooled, I took the Tim Holtz Mini Blending Tool and some blending foam and went to work.  I love these inks.  You don't HAVE to spritz them with water, in fact, for this card I like the "straight" (no water) technique.  I just patted my blending tool (with the foam on it) onto the ink and randomly sort of slid my ink around the card.  The ink is not exactly wet, but it is creamy so you can slide fairly easily.  And I used regular cardstock for this card.  Once I had the colors the way I wanted them, I simply sized the panel down, cut out the "Thank You" die in a complementing color and attached everything together.  I am very pleased with the colors I used and how well they work together.  I have been playing like CRAZY (lots of good info on Pinterest; I have a Distress Oxides board you might want to look at) and can't wait to show you the next card I made.  I resisted these inks, even after I saw what they could do, my left side brain said "They are just chalk ink" and my right brain  
Just another Look
said "Oh, heck no! Tim put out new ink!" and I researched them, YouTubed them, finally decided to bite the bullet, and I am SO glad I did!  You don't have to buy all of them (I didn't, I bought a few, played, and then bought all of them) at first; you can make stunning blends with just two or three of them.


It's a shame you can't see the card in person.  The colors are so pretty and so much brighter than the photos. Also, the "thank you" die cut is actually much more purple than pink, but I fiddled with the photos like crazy and I can't get the color to come out right, you'll have to trust me.  I've got a couple more cards in the works using these inks and I can't wait to share them with you.  Did you get the Oxide Inks? What do you think of them?

Thank you SO much for reading and I hope I've inspired you to try something new! Please consider following me (if you do, tell me in a comment so I can follow you back!) on any of the social media options I have on the sidebar.  Hope you are having a blessed day! Christi

I am entering my Thank You card in the following challenges:
a 2 z Scrapbooking - M, May Challenge - Sentiment is the Main Focus
Mix It Up - #1, May Challenge - Anything Goes w/option of Embossing
Making Memories - #5, May Challenge - Anything Goes
Simon Says Stamp Wednesday Challenge - A Hint of Pink (and Hero Arts)
Card Mania - #92, May Challenge, Life is Colorful
Color Throwdown - #441 

Tuesday, May 2, 2017

Sympathy Card & The April CCC Reveal


** two posts today - if you are looking for Stinkin' Inkers, click here**

This April's Card Chain Challenge is a sad one.  My receiving partner had a loss in her family, so I wanted to make her a sweet and simple condolence card.  To do that, this month I followed the sketch:
The CCC Sketch I Used
And here is the card I created for her:


I hope my card brings her some comfort. At the very least, she knows I am thinking of her.  


What I Used to Make my Card:
White Card Base
Black Card Panel
White Cardstock
Unity Stamp Peace, Courage & Memories sentiment, GKD-004A
Darice Embossing Folder, Vine Pattern, #1219-136
Spellbinders Nestabilities Labels Forty-One (on sale for $4.49!!)
Simon Says Stamp Detail White Embossing Powder
Embossing Fluid
Die-Versions Whispers Stitched Nesting Squares, #DV-572 (for fishtail)
White Resin Flowers (from stash)
Pop Dots

First thing I did was find a nice embossing folder.  I think the Vine Pattern embossing folder can be used for many occasions.  I cut a panel (which, in my case is typically 1/4" smaller than the card base) out of black card and ran it through my Big Shot to emboss it.  I also ran some scrap white card through,
Some Dimension
matching the pattern, but you can barely see it (tip: die cut your cardstock before you dry emboss it!)  Once the cardstock was embossed, I set the black panel aside to figure out how I was going to make the fishtail I needed to coordinate with the sketch.  I envy the people who can cut evenly using hand held scissors, or who can figure out how to turn cardstock the correct way and then use their cutter; I can do neither.  But, a light bulb went off in my head; if I could find a square that matched up with the width of the piece of paper I wished to fishtail, I could do it with the die cut.  Lucky for me I had just purchased the Stitched Nesting Squares, so I set about lining the card and the square up and it worked! I have taken pictures of the process:


Step One: Align the square with the ends of your paper.  The ends of the die should go over the ends just a little bit to accommodate the space around the die cut.  I use temporary tape to keep my dies in place; I did this long before washi tape came out and it's cheaper.  If you look closely you can still see a bit of the dry embossing.


And there you go! A perfect fishtail! Also, note that the stitches in the die aren't a problem; they appear on the cut out, not the base. Now, just peel off the tape and put your die away.  I hope, between my explanation and the pictures, the process makes sense.


After I handled the fishtail (I am SO proud, can you tell?) I moved on to the sentiment of the card.  I embossed "So Sorry" using detail white embossing powder.  I die cut it, attached the 2 white resin flowers, and pop dotted it onto the banner.  I then attached the banner onto the embossed panel of black cardstock.  There you have it.  A simple sympathy card.  Before I go I wanted to share the card I received from Lucille

How cute is that! She had known of my love of cats and I adore the card! Just click her name and it will take you to her blog.  Also, today is Reveal Day - don't forget to go to the Card Chain Challenge website to see all the glorious cards
Another Peek
that were sent all around the world!


I hope you have a great day and will come back to see me soon ~ Fondly, Christi 


I am entering my Sympathy Cards in the following challenges:
Word Art Wednesday - Anything Goes
Crafting When we Can - #43, C A S
Brown Sugar - #248, No Image, Just a Sentiment
Crafty Catz - #368, Anything Goes
Deep Ocean - #154, Anything Goes

It's Spring at Stinkin' Inkers!

** Two Posts Today - if you are looking for the CCC April Reveal, click here**

When I think of spring, I think of flowers and rain.  We don't get nearly enough rain here in Colorado; by August there is typically a water restriction and everything dies and turns brown.  But, while we CAN water, it's beautiful.  Right now I have tulips popping through all over the place.  This is my first spring in the new house and I am looking forward to seeing what comes up. The theme at Stinkin' Inkers this month happens to be spring so I created this little card, I hope you like it! 

What I Used to Make my Card:
White Card Base
White Card Panel
Watercolor Paper
Spellbinders D-Lites Petite Labels One, S3-205
Clean Color Brush Markers (Zig) in Carmine red, Pink, Blue, Orange, Violet, Green, Yellow & Cobalt Blue
Hero Arts MMK February 2017
Distress Ink in Pumice Stone and Hickory Smoke
Hero Arts Intense Black Ink
Green Card Scrap
Pop Dots
Craft Mat (enabler alert!!)
Detail Water Brush

I used the kit from February that Hero Arts sent out (My Monthly Kit) - I've been so busy, this is the first time I've had to use it!  If you are on Pinterest there are some amazing examples on how designers have used the kit; so inspirational!  Anyway, the first step for me was getting the white card panel (it was sized 5 1/2" x 4 1/4" because I knew I'd have to cut it down to fit onto the front of my card base) all set.  I stamped the clouds using hickory smoke and the rain using pumice stone.  There isn't much difference between the two but when they were wet they looked different.  I used my craft mat and smooshed some pumice stone onto it, then used my water brush to pick up the ink and filled in the clouds. I then stamped the 2 small clouds on watercolor paper (again, using hickory smoke) and used the pumice stone to fill them in.  I trimmed the white panel and die cut the clouds from the watercolor paper.

I stamped the little girl with the umbrella onto watercolor paper as well using the intense black ink; I knew I wasn't going to watercolor her, but the texture just grabs the color so nicely and the intense black ink is truly intense! This was
my first time using it and I will be keeping it on my desk for further use.  I used my clean color markers to color her and the umbrella (I have to confess, I set out the primary colors from the marker set and, as I colored in the umbrella, I realized there were more sections to it than I had colors! I had to improvise and pull out the violet and cobalt blue,) let her dry a bit and die cut her.  I saw a die cut in the kit that I wasn't exactly sure how to use.  Thank goodness that people post their
Another Peek
creations and due to that I figured out it was a mountain! Well, I made the mountain a hill, die cut out of green for a pop more of color.  


Lastly, I stamped the sentiment on some light gray cardstock I found in my stash.  I then die cut it using the Spellbinders die.  I wasn't sure how this card was going to work but I really like the outcome.  The colors are so vibrant and the pop dots are the perfect embellishment.  I hope you consider entering the challenge at Stinkin' Inkers this month. It's a just for fun, low pressure challenge, and my teammates are extraordinary.  Thank you so much for reading my tutorial.  Come back soon! Fondly, Christi

I am entering my Spring Card in the following challenges:
Crafty Calendar Challenge - M, April Showers/Spring
Pammie's Inky Pinkies - Anything Goes
613 Avenue - M, #196, Spring Has Sprung
Penny Black & More - M, April Challenge - Spring
Simon Says Stamp Monday Challenge - The Great Outdoors

Monday, May 1, 2017

House of Cards Challenge Sequins or Colors

Hello everyone! For April, House of Cards has come up with a fabulous challenge that I KNOW a bunch of you will want to enter.  You can use the colors below and/or sequins!
With sequins making such a huge comeback and how easy shaker cards are to make, I am hoping there are tons of entrants (that is your hint to play along!) Speaking of shaker cards, this is what I created for the challenge:


Of course, I made my shaker card the old way since I don't have any of the new foam cut outs and such; at least not yet (and right after I made this card I received an order of the Pop Up Shaker cut outs that Queen & Co. has released. Typical!)

What I Used to Make My Card:
Pink Card Base
Neat & Tangled Floral Heart Stamp Set
Neat & Tangled Floral Heart Nice & Neat Die Set
Neat & Tangled Sequins (I got mine free, but I think this mix matches)
Lindy's Gang Imperial Crown Purple Gold & Midnight Violet Embossing Powder
Embossing Ink
Paper Smooches Streamers Dies, # KFBD029
Tim Holtz Crazy Talk Stamp Set, # CMS236
Pop Dot Waste (see picture in post)
Purple, Pink and Dark Pink Cardstock
Purple Ribbon
Corner Rounder Punch

I am so in love with this set from Neat & Tangled! I won a gift certificate from them back in January and waited until both pieces of this set were in stock before I used it (absolutely fabulous customer service by the way!!)  I ordered some other gorgeous stamps that I will be using very soon; this is definitely one of my new favorite companies!

Anyway, I first stamped and embossed the floral heart with the Imperial Crown Purple Gold embossing powder and then die cut it.  I knew I was going to
Pop Dot Waste
make a shaker card with it, so I also die cut a piece of acetate and attached that.  Once that had dried I began making my "pocket" for the shaker goodies to go into.  What I used is what I call Pop Dot Waste - it's all of the outline of the pop dots once they are used.  So, I placed the pop dot waste around the floral heart, filled it with sequins and then attached it to a piece of pink paper.  I typically use a piece of paper that is much larger than I need to stick my shaker "pocket" because I keep the "pocket" on the table, wrong side up, and stick the paper on it so the filler doesn't fall out. If your paper that your shaker "pocket" is on won't lie flat to properly adhere to your card use some small bulldog clips but be sure to pad them; you don't want marks on your card! The last thing I did to the focal piece was cover the outside with ribbon I had in my

stash.  There were some places that the white pop dot waste was just too noticeable for my liking.  Sticking that ribbon around the pop dot waste was a test of patience as I had to keep checking it and tamping down the ribbon so it would get into the little nooks and crannies that were caused by the different shapes of the waste. I love shaker cards; especially 
now that they are so easy.   I just got a kit from Dies R Us, made by Cheery Lynn, that has everything 
Another Look
you need (it even has 2 dies to make filler with! One is a teensy, weensy little heart that says Love You on it - Sooo cute) to make shaker cards.
  

So once the main card was done, I used the sentiment from Tim's Crazy Talk Stamp Set to stamp and emboss using Midnight Violet embossing powder.  I attached the sentiment onto a banner I had die cut and I was done. I think it may be a tad crooked, but I can't tell for some reason.  I look at it one day and it looks fine, the next day it's crooked.  Ah well.  I hope you can pull out your sequins, or colored cardstock, and join us at House of Cards. We vote on the winner and the top choices and we'd love it if you made it really hard for us to choose, so come play with us!  Have a wonderful day! Fondly, Christi

I would like to enter my Shaker Card in the following challenges:
Allsorts - #413, Embossing
My Time to Craft - #344, Sequins and/or Buttons
Simon Says Stamp Wednesday Challenge - Anything Goes
Tuesday Throwdown - #340, Embossing
{PIN}spirational - I used "Thinking of You"